–
235 KB – 7 Pages
PAGE – 1 ============
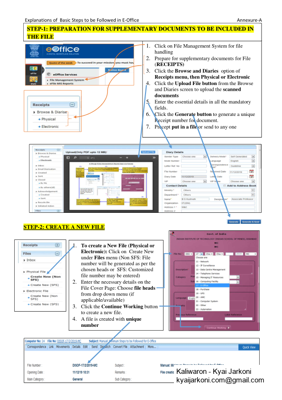
˘ˇ STEP-2: CREATE A NEW FILE 1. Click on File Management System for file handling 2. Prepare for supplementary documents for File (RECEIPTS) 3. Click the Browse and Diaries option of Receipts menu, then Physical or Electronic 4. Click the Upload File button from the Browse and Diaries screen to upload the scanned documents 5. Enter the essential details in all the mandatory fields. 6. Click the Generate button to generate a unique Receipt number for document. 7. Precept put in a file or send to any one STEP-1: PREPARATION FOR SUPPLEMENTARY DOCUMENTS TO BE INC LUDED IN THE FILE 1. To create a New File (Physical or Electronic): Click on Create New under Files menu (Non SFS: File number will be generated as per the chosen heads or SFS: Customized file number may be entered) 2. Enter the necessary details on the File Cover Page: Choose file heads from drop down menu (if applicable/available) 3. Click the Continue Working button to create a new file. 4. A file is created with unique number
PAGE – 2 ============
˘ˇ STEP-3: WRITING NOTINGS 1. Writing Green Note: Click on Add Green/Yellow Note Button ( User will get an editor with limited formatting tools; and can type the notes in English as well as in local language(Hindi or other)) ˆ˙ Writing Yellow Note: Click on Add Yellow Note Button ˝˙ Write Yellow Note and Click on Submit ˛˙ ˚˜ ! “#$ %˙ ˚˜ ˘! ˇ! &˙ ˘
PAGE – 3 ============
˘ˇ STEP-4: CREATING DRAFTS FOR APPROVAL 1. Creating a new Draft in a File: First open the concerned file and chose the link Draft, then a window with a word editor will be opened 2. Provide the Required Information with Draft details and Communication details cat egory. 3. Draft can be prepared by : a. Directly typing the draft content in editor itself b. Choose the draft template from the ‚ Choose from Template ™ option and add the draft content in it. c. Use the ‚Upload File™ option to upload the draft file prepared separatel y by using Microsoft Word / Open Office word processing applications or in other formats 4. Click on Save Button to save the draft. (Drafts are not auto sav ed like notes) 5. Click on Quick View option to view the notes file/correspondence file/ other drafts in file while preparing the draft. 6. To attach any other supporting document along with draft the user can use Attach File option.
PAGE – 4 ============
˘ˇ STEP-5: DRAFT FOR APPROVAL (DFA) 1. Approving the draft ( additional action ): To approve a draft in file the authorised user has to open the concerned file first. Then use Draft View draft, to open the draft by clicking on the Draft No. , you can view the draft content and the Informat ion(Meta data) about the draft 2. Can View/Edit 3. By clicking on the Approve™ button you can approve the draft. 4. Click OK under Approval Confirmation Message( One the draft gets approved no further change can be possible in the approved draft.) 5. Dispatching the draft: Dispatch by Self or Dispatch by CRU (Central Registry Unit/Dispatch section). 6. Click on Dispatch by Self and use the options:
PAGE – 5 ============
˘ˇ STEP-6: ADDITIONAL APPROPRIATE ACTIONS 6(a) LINKING AND ATTACHING OF FILES/RECEIPTS 1. Link a File: a file can be linked to another file. While linkin g, a copy of the file is attached to the corresponding file and not the original file. The o riginal file remains in the Inbox itself. a. Click on option Link -> Choose the first option fiIn ternal files/Referred in filefl -> Link/Delink b. Select the file which is to be linked from the list of files which are there in your inbox or completed folders displayed in the new window. c. Then Click on fiAttachfl Button. 2. Attach a File: Attach file mechanism can be used to process a transfer file from one section to other section or it can be used to process a reference file coming from another dep artment. The original file will be attached to the routine file when the users do this process. The attached file should be detached to close the routine file. a. After Opening the routine file, click on the option : Attachment File b. Click on Attach File, give remarks and then click OK 3. Detach a File: click on Attachment ->File, Select the file to be detached from list and click detach File. TOC/Recent/All: ‘(˚˚ˇˇ)*˘! ˙”+,$ ‘!!!ˇ-! ˚ˇˇ)*˘!˙ ‘!!!˚ˇˇ)*˘ !˙ ˘ˇˆ˙ ˝˛˚˚˛˜˚ ˛!˚”˚˚˛#ˇ ˛$% $Inbox under Receipt/File Menu: contains the list of all the receipts/Files that are received as an Inward Correspondence. Click the Receipt/File number to view the File. .˘/”-$
PAGE – 6 ============
˘ˇ 0˙ Use any of the following form many options provided File: ˙ Reply to reply to the sender of the Receipt/File. ˙ Close to close a receipt/File by providing the closing r emarks. ˙ View Draft to view the drafts that are already created with r eceipt/File. ˆ˙ Inbox under File Menu: contains the list of all the Files (E-Electr onics/P-Physical) that are received by the user for further actions. Click the File No. to view the Content of the file (Notes/Correspondence/Draft etc.). ˝˙ User can perform 12(11 same as in Files of +Reply) different operations on a file, which is opened form the inbox: ˛˙ To include additional document click on Created/In box under Receipts menu %˙ Select document(receipt) and click on put in a File &˙ ˘ˇ1! &’ 2ˇ ˇ˝(˙( 3˙ (!˜ ) ˘!˘ “2$!
235 KB – 7 Pages